Git Project: A Real Feature-Branch Workflow
Tie it together: clone, branch, commit, push, open a pull request, handle a conflict, and merge. A realistic end-to-end Git and GitHub workflow, step by step.

You've learned every move on its own: commits, branches, remotes, pull requests, resolving a conflict. This is the lesson where they stop being separate tricks and become one thing you do without thinking. We're going to ship a small feature into a shared repo, start to finish, exactly the way a real team does it: pull the latest code, branch off, do the work, push it up, open a pull request, get a review, fix a conflict, merge, and clean up. Every step is a real command. Run them on any repo you have write access to and you'll have done a complete professional Git cycle by the end.
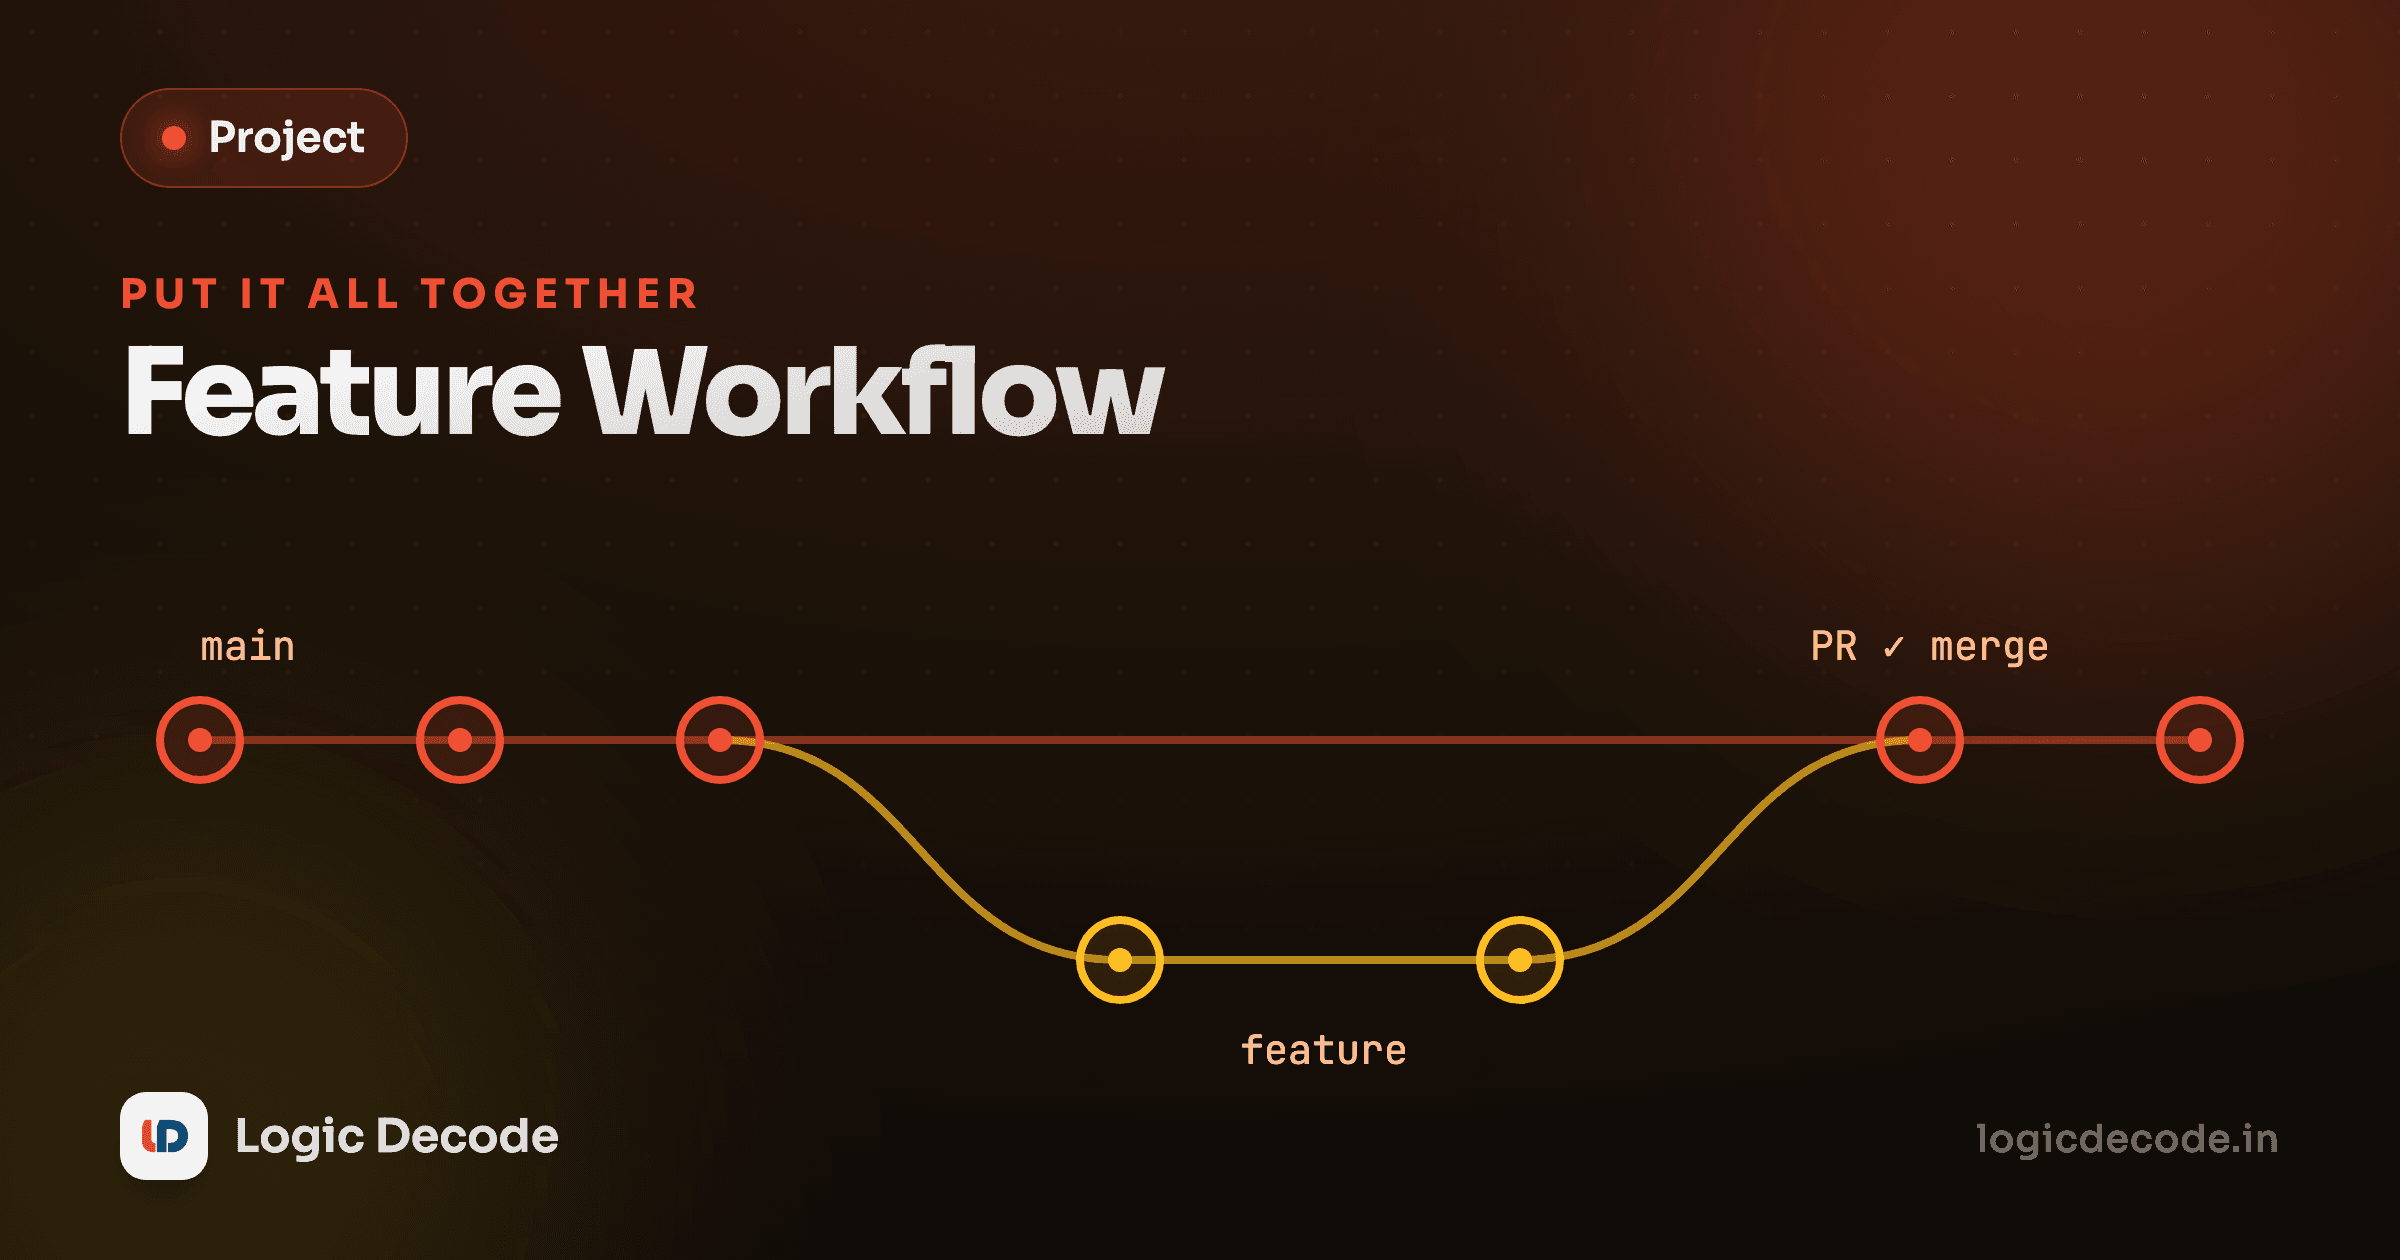
Here's the whole shape before we walk it:
Read that left to right. The straight line is main, the shared trunk everyone agrees on. Your work lives off to the side on a branch, growing its own commits while main keeps moving (someone merged a footer change while you weren't looking). At the end your branch folds back into main in a single merge. Your whole feature lands at once, reviewed and clean. That diverge-and-rejoin is the heartbeat of nearly every team that uses Git. Let's actually do it.
The scenario
You've joined a small team building a shop site. The repo lives on GitHub. Your task: add a search filter to the product page. You don't push straight to main (nobody does). You do the work on a branch and propose it through a pull request. We'll use a teammate, Maya, to play the reviewer and to cause one small collision along the way, because that's what real repos do.
Step 1: Get the latest main
Before you touch anything, sync. The main on your laptop is probably behind the main on GitHub, because other people have been merging while you were off doing other things. Starting a feature on stale code is how you create conflicts you didn't need.
git checkout main
git pull origin main
git checkout main makes sure you're standing on the trunk. git pull fetches whatever's new on GitHub and fast-forwards your local main to match. Now your starting point is current. If you cloned the repo fresh today with git clone, you can skip the pull. A clone already gives you the latest. (If "remote," "origin," and "clone" feel fuzzy, the remotes and GitHub lesson is the one to revisit.)
Step 2: Create a feature branch
Never build on main directly. Make a branch named for the work, switch to it, and now you have a private sandbox where you can commit freely without affecting anyone.
git checkout -b feature/search-filtergit checkout -b creates the branch and switches to it in one move. The -b is "branch and check out." The name feature/search-filter is a convention, not a rule: a feature/ prefix and a short description of what it does. Run git branch and you'll see the asterisk has moved to your new branch. Everything you commit now happens here, off to the side, leaving the trunk untouched. This is the whole reason branches exist: isolation.
Name branches for your future self
feature/search-filter tells anyone glancing at the branch list exactly what's cooking. fix-stuff or maya-test tells them nothing. On a team you'll be living in git branch -a output, so make your branch names earn their place there.
Step 3: Do the work, in a couple of commits
You write the code. As you reach natural checkpoints, you commit. Don't dump everything into one giant commit at the end. Small, focused commits are easier to review and easier to undo if one of them turns out wrong.
git add product-list.js
git commit -m "Add search filter input to product list"
Then you wire the input up to actually filter results, and that's a second logical chunk:
git add product-list.js search.js
git commit -m "Filter products as the user types"
Two commits, each a complete thought. Your branch now has two save points the trunk doesn't. Run git log --oneline and you'll see them sitting on top of the commit you branched from.
Quick check
You ran git checkout -b feature/search-filter, then made two commits. Where do those commits live?
Step 4: Push the branch and open a pull request
Your commits are still only on your laptop. To share them, and to start the review, push the branch up to GitHub:
git push -u origin feature/search-filterThe -u (short for --set-upstream) links your local branch to the one on GitHub, so future pushes are just git push with no arguments. GitHub responds in the terminal with a link to open a pull request. Click it, or go to the repo on GitHub and hit the Compare & pull request button it shows you.
A pull request is you saying "here's my branch, please review it and merge it into main." Give it a clear title and a description of what changed and why. Your teammates can read the diff, leave comments, and approve. We covered the why and the how in the pull requests lesson. Here it's just one beat in the rhythm.
git push -u origin feature/search-filter
# remote: Create a pull request for 'feature/search-filter' on GitHub by visiting:
# remote:   https://github.com/yourteam/shop/pull/new/feature/search-filter
Step 5: A teammate requests a change
Maya reviews the PR. The feature works, but she leaves a comment: the search should ignore case, so "SHIRT" finds "shirt." Fair. You don't open a new PR for this. You just add another commit to the same branch, and the PR updates itself automatically.
git add search.js
git commit -m "Make search case-insensitive"
git push
Because the branch is already linked to the PR, that push shows up right inside it. Maya sees the new commit, the diff updates, and she can re-review. This is the loop: review, push a fix, re-review, until everyone's happy. No new branches, no new PRs. The conversation and the code stay in one place.
The PR is a living thing
A pull request isn't a frozen snapshot you submit once. Every push to the branch updates it. That's why review feedback is cheap: you address a comment with one more commit, not a whole new submission.
Step 6: A merge conflict appears
While you were working, Maya merged her own footer change into main, and it happened to touch the same product-list.js file you did, on lines close to yours. Now GitHub flags your PR: "This branch has conflicts that must be resolved." Git can usually merge two sets of changes by itself, but when both sides edited the same lines, it refuses to guess and hands the decision to you.
Bring main's new commits into your branch so you can sort it out locally:
git pull origin mainGit stops and tells you exactly where it's stuck:
Auto-merging product-list.js
CONFLICT (content): Merge conflict in product-list.js
Automatic merge failed; fix conflicts and then commit the result.
Open the file and you'll find Git's conflict markers around the clashing section:
<<<<<<< HEAD
const items = products.filter(matchesSearch);
=======
const items = products.filter(inStock);
>>>>>>> main
Everything between <<<<<<< HEAD and ======= is your version (the search filter). Everything from ======= to >>>>>>> main is what came from main (Maya's in-stock filter). Git isn't asking you to pick one. It's asking you to decide what the correct final code is. Here, you actually want both: filter by search and stock. So you edit it into the version you want and delete all three marker lines:
const items = products.filter(matchesSearch).filter(inStock);Then mark it resolved and finish the merge:
git add product-list.js
git commit -m "Merge main and combine search with stock filter"
git push
That's the whole conflict dance: pull, find the markers, write the right code, remove the markers, add, commit, push. The PR clears its conflict warning the moment you push. If conflicts still feel scary, the merging and conflicts lesson walks through them slowly, but you just did one for real.
Quick check
During a conflict, what do the lines between <<<<<<< HEAD and ======= represent?
Step 7: Approve and merge
Maya re-reads the PR, sees the conflict resolved and her comment addressed, and clicks Approve, then Merge pull request. Your branch folds into main. That's the final node on the gitGraph above, where the side line rejoins the trunk. The feature is now live in the shared codebase, with the full story preserved: two feature commits, a review fix, and a merge.
Most of this happens in GitHub's UI, but the equivalent on the command line is just a checkout-and-merge:
git checkout main
git pull origin main
git merge feature/search-filter
Whether your team merges via the GitHub button or the command line is a style choice, the same one behind rebase vs merge. The result is identical: your work is part of main.
Step 8: Clean up the branch
The feature shipped, so the branch has done its job. Leaving merged branches lying around just clutters everyone's branch list. Delete it in both places:
git checkout main
git pull origin main
git branch -d feature/search-filter
git push origin --delete feature/search-filter
git branch -d removes the local branch (the lowercase -d only works if it's already merged, which is a nice safety check that won't let you accidentally throw away unmerged work). The last line deletes the copy on GitHub. Then git pull once more and your main includes the feature you just shipped. You're back exactly where you started in Step 1, with a clean trunk and current code, ready for the next task.
The cycle never changes
Pull, branch, commit, push, PR, review, merge, delete. That eight-step loop is what a developer does dozens of times a week, for a one-line typo fix or a thousand-line feature. The size of the change varies. The workflow doesn't. Get this loop into your fingers and you can work on any team that uses Git.
You've done the whole thing
That's a complete, realistic feature-branch workflow, the same one teams run on every day. You pulled the latest trunk, branched off, committed your work in logical pieces, pushed and opened a pull request, took review feedback as another commit, hit a real merge conflict and resolved it by hand, got the PR merged, and cleaned up after yourself. Every command you ran is one you'll run again the next time you ship anything. The named pattern, if you want to read the canonical write-up, is GitHub flow, and you just executed it.
Step back and look at how far this series came. Way back in Why Git? the whole idea was killing the project-final-FINAL-v2 folder graveyard with a timeline of save points. From there you made your first commit, learned to stage and write good commit messages, and read your history with log and diff. Then the team skills: branches for isolation, merging and handling conflicts for bringing work back together, undoing mistakes without panic, remotes and GitHub for going from your laptop to the cloud, pull requests for review, and rebase vs merge for keeping history readable. Every one of those showed up in this single workflow. That's the point of a capstone: the pieces were never meant to live apart.
Where to take it from here: go contribute. Find a small open-source project on GitHub, fork it, fix a typo in the docs or a tiny bug, and open a pull request. It's the exact loop you just practiced, except the maintainer is the reviewer instead of Maya. Nothing teaches Git like using it on code that isn't yours. And if you want to revisit any lesson, the whole Git & GitHub series is right there. You're no longer someone who's heard of Git. You're someone who ships with it.

Written by
Rhythm Bhiwani
Engineer and relentless builder, happiest reverse-engineering hard problems until they click.
Enjoyed this?
Tap the heart to leave some love.
Be the first to react
Comments
Join the conversation.
Loading comments…